This freelancer invoice example can help you set up your own invoice quickly and easily. Great for photographers, copywriters, consultants, developers and more!
Ever wondered what an invoice should look like? This is a freelancer invoice example for a photography job.
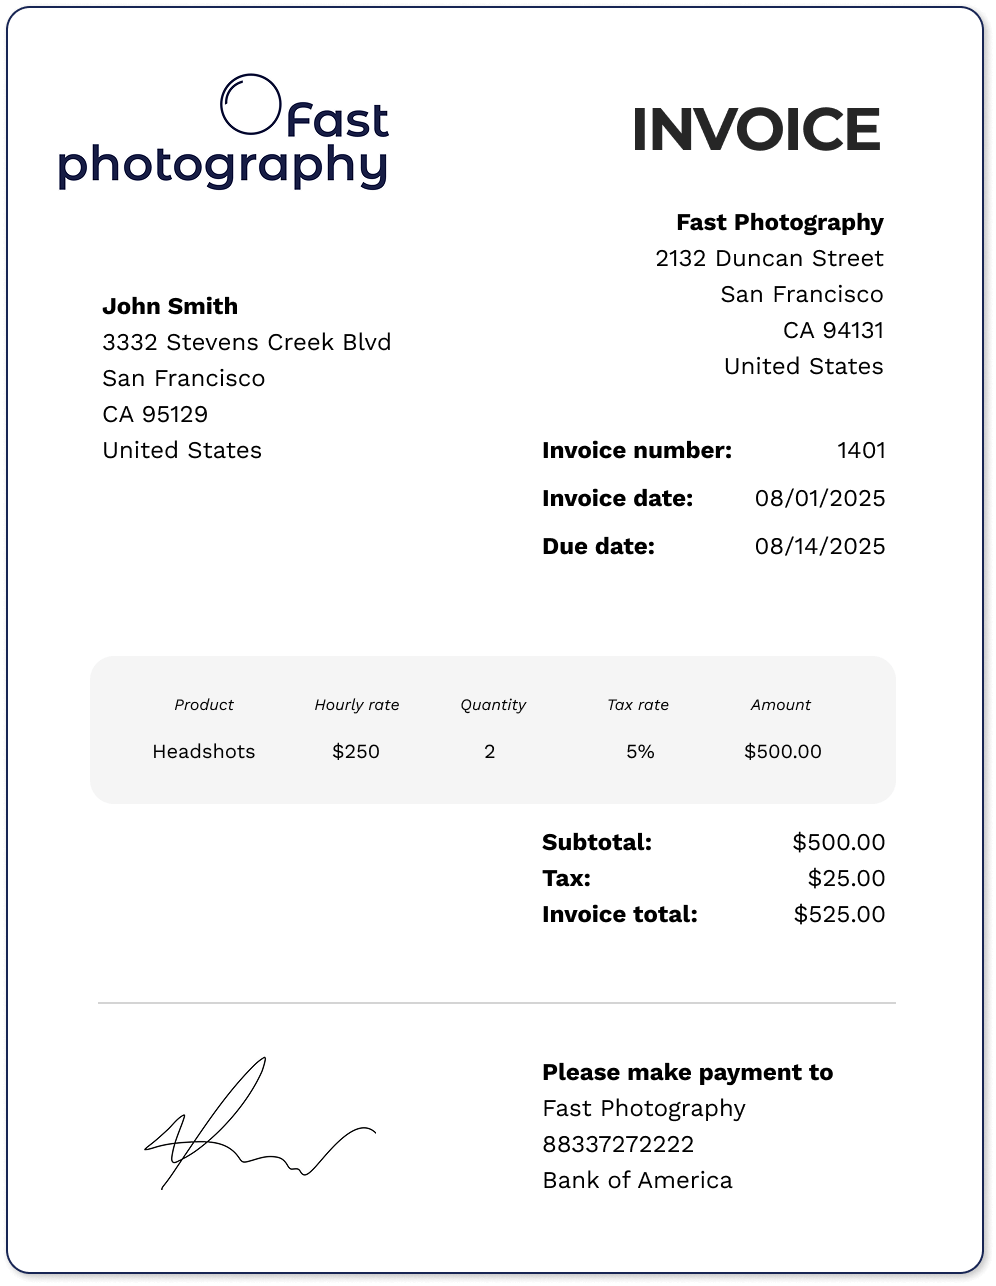
Let’s go through all the different elements. 👇
1. Header
At the top of the invoice is the header ‘invoice’ or ‘tax invoice’. This lets the customer easily see what the document is. As part of the header you also want to include your logo so that the customer can identify who the invoice is from.
Don’t have a logo yet? Here’s how you can easily make a logo for your business.
2. To and from
Add your business name and address to the top of the invoice so it’s clear who it’s from. This is also important since the invoice acts as a legal document that validates you and your customer’s bookkeeping, and which you can be required to provide if you’re ever audited.
You can also add contact information such as your email address, phone number or website URL to make it easy for the customer to contact you if they have any questions.
Next, add your customer’s name or business name, and address so it’s clear who the invoice is for. They need the invoice for their bookkeeping.
3. Dates and invoice number
You need to add two dates to your invoice: the invoice date—the date the invoice was made—and the due date—the deadline for the client to pay the invoice.
Some businesses offer customers 7 day payment terms, others have 14 or 30. What you choose is up to you. Read more about payment terms.
The invoice number is a unique ascending number that you have to add to each invoice. It doesn’t matter what number you start at, but the next invoice has to have the next number in the sequence. If you start at 14500, for example, the next invoice has to be 14501.
4. Info about the products and prices
In the middle section, you want to describe what you’ve sold. In this case it’s headshots, with an hourly rate of $250. You spent 2 hours on the job, so we’ll add that in the quantity field, as well as the 5% tax rate that applies to the sale. This rate varies from country to country. If there is no sales tax, you can set this field as 0%.
If you haven’t been able to decide on what prices to charge, you can use the freelance hourly rate calculator or check out this article on how to set a price for your services.
See also: What do I do about tax on my invoice?
5. Info about how to pay
Lastly, you’ll want to add information about how the client can pay you, whether that’s bank transfer details, a PayPal link or a QR code that takes them to a payment gateway.
It’s a good idea to offer several payment options, if you can, since this makes it easier for the customer to pay you.
Studies also show that adding ‘thank you’ and ‘please’ to your invoice makes it 40% more likely that you’ll get paid within 7 days.
See also: How to make more money as a freelancer
How to make a freelancer invoice
Now you know what goes into an invoice, but how do you actually make one?
There are several options:
- Buy an invoice pad and make it using pen and paper. This is an easy way to do, but over time it’ll mean a lot of handwriting for you, and it won’t look very professional.
- Use an invoice template—this means you can make an invoice in Word or Excel. It’s faster than pen and paper, but you’ll have to do more manual work to store and follow up on your invoices.
- Use an invoice generator. This is an online tool that you can use to generate invoices by filling out the details and clicking to download a PDF. However, none of your details will be saved, so while it’s free and it’ll be quick to make your first invoice, the amount of manual typing you’ll have to do—not to mention storing and following up on invoices–mean it’s probably not worth it.
- The most professional option is free invoicing software. With free invoicing software, your details will be automatically added to the invoice. Once you’ve invoiced a customer, you can quickly pull their details to invoice them again. Products and services are also saved. The biggest benefit though, is that you’ll be notified when an invoice is overdue so that you can follow up with customers and make sure you’re paid. The software is free, so you can try it out to see if you like it—no strings attached.